Run today down to the annual Steve Biddlecombe classic car show at Romsey. Trig performed without fault including rescuing a stranded Porsche Speedster that had a flat battery while on the homeward bound leg. Ran veg all the way ;)
Big turnout for the show this year. A LOT of people turned out. Not been for 10 years and back then it was only around 10 cars that showed. I would estimate this year it was around 200 pre '76 cars and the same number bike wise. A good number being US muscle which makes a nice change from MG's/TR4/TR6's etc. Nothing better than a bit of large capacity V8 rumble?
On arrival home I noticed the clutch pedal had traces of leaking hydra fluid. Looks like the master cylinder has gone south. This is one I salvaged from my previous S3 with a new seal kit. Quality of the 'kit' unknown. So it looks like a new TRW Lucas/Girling is needed. Will check tomorrow.
Also the Smiths cab heater seems to have sealed after the flush and rad seal added a month ago. No signs of any leakage after the run today. Outside temp around 9 Deg.C and with the tarp buttoned up and the fan off it was still cosy in the cab. With fan on it was too warm IMHO ;)
I need to get the tyres sorted though. Braked hard when I saw the stranded Porsche and the rear locked immediately. It has done this before. It takes just a dab to lock the rears with no weight in the back tub. These Lassas need to go and be replaced either with new or the part worn Wranglers I have in the yard.
27 December 2011
27 November 2011
27th Nov 2011 - SVO system failure - again!
After replacing the veg tank filter with the large Perkins 296 CAV cartridge type after the in-line original became bunged with gel I thought I had got to the bottom of the recent SVO fuel starvation. I had not.


CAV296 filter assy
Last weekend I headed out to meet up with some of the guys from the S2 forum local 'chapter' and after a couple of mins switched over to SVO the engine started to baulk due to a lack of fuel. Tried it once more after driving a few miles on dieso and then had the same problem. As I didn't flush the system last time after fitting the new filter I 'assumed' more crud had worked its way through and bunged the new filter?
Roll on today and as soon as I opened the underseat filler to the SVO tank and then heard the woosh as the tank pressure came back to atmospheric. I then realised the cause of the problem!
When I rebuilt both tanks I fitted new rubber gas cap seals - so they actually do seal (rare for LR?). In this case I sealed it up a bit too well and the sprung vac vent in the cap had become gummed up with polymerised veg oil - so it would not vent at all. Duuuugh?
I cleaned the vent port and also swapped for the dieso side fuel cap as this had a bigger vent port so this should be less likely to gel up. Also drained the full veg tank of +40 litres of oil to check how much crud was floating in there and could cause future problems. The result was I found the tank was spotless clean inside. Zero crud. The few bits I found the other week in the inline filter must have been from earlier trials a year or so ago?
Tank now refilled and left running for 40 mins on SVO without any issues. I couldn't get Trigger out of the drive for a run due to my other vehicles, and time limitations, but fingers crossed I have hit the nail on the head this time?
31 October 2011
29th October 2011 - Exhaust done/SVO problems/steering adjust/coolant flush
It was surprising to me how much actually was done over this weekend with the limited time available and the grotty weather this weekend.
EXHAUST MODS
Some weeks ago Stu ('Twizzle') donated a MK1 Discovery back box which was in very good condition. A small straight-thro' type and length wise it looked like this would serve as a side exit mod. It did.
Some coordinated slug scattering and a coat of VHT paint and the result was this....

I am still debating whether I need to fit another support bracket on the downpipe but it all looks good so far. Quite a bit quieter too ;)
SVO PROBLEMS
Driving around SPTA on Saturday I switched over to the veg tank and after only a few hundred yards I sensed fuel starvation - and then the engine cut out. Re-started on dieso and it all ran without fault - until I switched back to SVO and the same problem occurred.
SVO tank was full so it wasn't lack of fuel so the first point to check was the coarse bio filter on the outlet of the SVO tank. Check out the picture below .......I think this is the cause ;)

Filter was blocked with gunky bacterial ridden veg oil and what looks like spice debris. How these particles ended up there is a mystery as the SVO is filtered down to 1 micron? Maybe the grotty storage container I was using for SVO?
So three plans of attack.
STEERING ADJUSTED
Tweaked the steering box again to remove a bit more slack and initially set it a bit too tight. It wouldn't even return to center under it's own steam! Slackened it off a tad and that seems a lot better.
Then had a look at the steering stops and they have been wound in further and that still leaves 0.5" - 0.75" clearance before the 7.50's touch the front parrots on the LWB rims.
COOLANT FLUSH/SMITHS LEAKING
In an attempt to stop the very slight weep I found on the Smiths cabin heater the other week I dropped in a bottle of rad flush and ran that around for 20-30 miles over a couple of days. Dropped the lot and flushed clear. System now refilled with 30% antifreeze and radweld. Whatch this space to see if that works.
So far so good.
CB INSTALL
After the radio was dropped in there last week now the parts to complete the antenna fittment to the offside have arrived. So now I could fit that. Despite the same antenna being used on both sides of the vehicle (nearside is a mag mount but placed in the same position on the vehicle body mount) it will not come down to anywhere near the same VSWR on the stud fitting.
The mount/coaxial etc. all has low resistance where necessary but I cannot get the SWR below 3:1. A right PITA. Trimming the antenna length down improved the match to that level but I am nervous of trimming it further as the current length is fine on the other mount?
I will wait for Ian to pass me the short Stinger type antenna soon and see how that performs.
Butt list status now lies at...........
1.Modify the exhaust to tame it down a tad? - I have bits but have't got to this yet - DONE
2.Fit an interior light - Ordered a magnetic battery powered one which will do the job.
5. Rear hub bolts worked loose the other day after a 20 mile fast run. Nipped up again but seem to be working loose? Bought a spare pair of hubs but and will keep an eye on this. So far no more problems.
6. Fit interior door handles
8. Windscreen washer not working - now seems to be fine?
9. Reverse light not working - checked at the weekend and is working.
10. Adjust play in steering box and move steering stops - DONE
11. Smiths heater leaking :o - Fixed? Let's see shall we?
12. Get the old Lassa crossply's removed and the Bridgestone Wranglers fitted to the LWB rims.
13. Lower the combat chassis spring mounting points to their lower position.
14. Fit some sort of secure storage in the cab area (ammo box?).
EXHAUST MODS
Some weeks ago Stu ('Twizzle') donated a MK1 Discovery back box which was in very good condition. A small straight-thro' type and length wise it looked like this would serve as a side exit mod. It did.
Some coordinated slug scattering and a coat of VHT paint and the result was this....

I am still debating whether I need to fit another support bracket on the downpipe but it all looks good so far. Quite a bit quieter too ;)
SVO PROBLEMS
Driving around SPTA on Saturday I switched over to the veg tank and after only a few hundred yards I sensed fuel starvation - and then the engine cut out. Re-started on dieso and it all ran without fault - until I switched back to SVO and the same problem occurred.
SVO tank was full so it wasn't lack of fuel so the first point to check was the coarse bio filter on the outlet of the SVO tank. Check out the picture below .......I think this is the cause ;)

Filter was blocked with gunky bacterial ridden veg oil and what looks like spice debris. How these particles ended up there is a mystery as the SVO is filtered down to 1 micron? Maybe the grotty storage container I was using for SVO?
So three plans of attack.
- First, 1 litre of petrol added to the 30-40 litres of SVO already in the tank which should kill any bacterial build-up already in there.
- Second, replaced the SVO storage vessel with a fresh clean item.
- Thirdly, temporarily removed the filter and either clean the existing filter and refit or replace with a new larger CAV296 Perkins/Lucas spin on type I have to hand (if I can find the fittings)? 1/2"x20 NPT probably?
STEERING ADJUSTED
Tweaked the steering box again to remove a bit more slack and initially set it a bit too tight. It wouldn't even return to center under it's own steam! Slackened it off a tad and that seems a lot better.
Then had a look at the steering stops and they have been wound in further and that still leaves 0.5" - 0.75" clearance before the 7.50's touch the front parrots on the LWB rims.
COOLANT FLUSH/SMITHS LEAKING
In an attempt to stop the very slight weep I found on the Smiths cabin heater the other week I dropped in a bottle of rad flush and ran that around for 20-30 miles over a couple of days. Dropped the lot and flushed clear. System now refilled with 30% antifreeze and radweld. Whatch this space to see if that works.
So far so good.
CB INSTALL
After the radio was dropped in there last week now the parts to complete the antenna fittment to the offside have arrived. So now I could fit that. Despite the same antenna being used on both sides of the vehicle (nearside is a mag mount but placed in the same position on the vehicle body mount) it will not come down to anywhere near the same VSWR on the stud fitting.
The mount/coaxial etc. all has low resistance where necessary but I cannot get the SWR below 3:1. A right PITA. Trimming the antenna length down improved the match to that level but I am nervous of trimming it further as the current length is fine on the other mount?
I will wait for Ian to pass me the short Stinger type antenna soon and see how that performs.
Butt list status now lies at...........
2.Fit an interior light - Ordered a magnetic battery powered one which will do the job.
5.
6. Fit interior door handles
11. Smiths heater leaking :o - Fixed? Let's see shall we?
12. Get the old Lassa crossply's removed and the Bridgestone Wranglers fitted to the LWB rims.
13. Lower the combat chassis spring mounting points to their lower position.
14. Fit some sort of secure storage in the cab area (ammo box?).
24 October 2011
24th October 2011 - Few more bits out of the way
Current butt list update (bits keep being added as a few get knocked off)...
1.Modify the exhaust to tame it down a tad? - I have bits but have't got to this yet
2.Fit an interior light - Ordered a magnetic battery powered one which will do the job.
3. One of the rear brake lights has an intermittant fault so a new Lucas 488 is on order - Done
4. Smiths heater fan is rubbing inside the casing - Done
5. Rear hub bolts worked loose the other day after a 20 mile fast run. Nipped up again but seem to be working loose? Bought a spare pair of hubs but and will keep an eye on this. So far no more problems.
6. Fit interior door handles
7. Fit battery isolator - Done
New ones......
8. Windscreen washer not working.
9. Reverse light not working.
10. Adjust play in steering box and move steering stops.
11. Smiths heater leaking :o
12. Get the old Lassa crossply's removed and the Bridgestone Wranglers fitted to the LWB rims.
10-4 GOOD BUDDY - C'MON
I was asked during the last S2 meet if I had a CB for comms between vehicles. At the time there was nothing fitted in Trig's, though I had a UK/Euro one waiting in the garage. Just needed to pull my finger out and get the job done.
The temporary mag mount on the nearside military antenna base was a no go as this kept getting nudged off by low hanging branches so I fitted an offside antenna mount. Knocked up a couple of ally plates for the top of each of these and fitted a 3/8" stud mount on the offside one. Also Ian C from the S2 club has promised me a short Stinger which is far less inclined to be smacked off than the 5ft Modulator when I am out and about?
The nearside mount is spare for now but I may fit a VHF antenna on there later. Also bought a remote speaker to stick on the dash (as if I'd hear it when the engine's running!).
SMITHS HEATER
While sorting out the rattl'y heater fan the other day (blades just needed a slight tweak) I found a small weep on the heater coils. Very minor but could get worse? :( For now the heater has been bypassed and I will give Radweld a go. Hopefully that will patch it?
What I did find was even though outside temps are now down to around 10 Deg.C, once the tarp is buttoned up it does get quite cosy in there. I guess most of the heat comes up through the floor from the tx and engine?
Cash was getting a bit limited now sproggo has come along so Trigger cash has had to be curtailed. But I did have a pile of unused parts scattered about the place that I no longer needed. So off to Ebay they went to release some funds.
Complete truck cab in VGC with all the mounting bolts. Even had new window runners - £150
S2A 'Maltese cross' wire rad mesh - £60
S2A/3 windscreen complete - £20
Used £20 to buy a spare pair of hubs and some of the rest was spent on 5 litres of proofer for the canvas, CB bits etc ;)
SOUTH EAST DISTRICT LOGO
Right at the start of the Trigger rebuild sanding back the nearside wing front and rear revealed the SE Command logo (now corrected SE District as per the info in the pic below) which I have as the title picture at the top of this blog. Since then I have had the word out that I need a quality pic of a whole one to get some vinyl ones made from. I could have traced and hand painted but that would have been a PITA for the vertical rear emblem.
Well it looks as if this may all becoming good!
Friend and neighbour while passing thro' the officers mess at Aldershot discovered the original artwork used as the basis of the SE logo! I now have a hi res pic ! But...the original artwork is far more detailed than the decals stuck on Trigger. Compare below.


1.Modify the exhaust to tame it down a tad? - I have bits but have't got to this yet
2.Fit an interior light - Ordered a magnetic battery powered one which will do the job.
5. Rear hub bolts worked loose the other day after a 20 mile fast run. Nipped up again but seem to be working loose? Bought a spare pair of hubs but and will keep an eye on this. So far no more problems.
6. Fit interior door handles
New ones......
8. Windscreen washer not working.
9. Reverse light not working.
10. Adjust play in steering box and move steering stops.
11. Smiths heater leaking :o
12. Get the old Lassa crossply's removed and the Bridgestone Wranglers fitted to the LWB rims.
10-4 GOOD BUDDY - C'MON
I was asked during the last S2 meet if I had a CB for comms between vehicles. At the time there was nothing fitted in Trig's, though I had a UK/Euro one waiting in the garage. Just needed to pull my finger out and get the job done.
The temporary mag mount on the nearside military antenna base was a no go as this kept getting nudged off by low hanging branches so I fitted an offside antenna mount. Knocked up a couple of ally plates for the top of each of these and fitted a 3/8" stud mount on the offside one. Also Ian C from the S2 club has promised me a short Stinger which is far less inclined to be smacked off than the 5ft Modulator when I am out and about?
The nearside mount is spare for now but I may fit a VHF antenna on there later. Also bought a remote speaker to stick on the dash (as if I'd hear it when the engine's running!).
SMITHS HEATER
While sorting out the rattl'y heater fan the other day (blades just needed a slight tweak) I found a small weep on the heater coils. Very minor but could get worse? :( For now the heater has been bypassed and I will give Radweld a go. Hopefully that will patch it?
What I did find was even though outside temps are now down to around 10 Deg.C, once the tarp is buttoned up it does get quite cosy in there. I guess most of the heat comes up through the floor from the tx and engine?
Cash was getting a bit limited now sproggo has come along so Trigger cash has had to be curtailed. But I did have a pile of unused parts scattered about the place that I no longer needed. So off to Ebay they went to release some funds.
Complete truck cab in VGC with all the mounting bolts. Even had new window runners - £150
S2A 'Maltese cross' wire rad mesh - £60
S2A/3 windscreen complete - £20
Used £20 to buy a spare pair of hubs and some of the rest was spent on 5 litres of proofer for the canvas, CB bits etc ;)
SOUTH EAST DISTRICT LOGO
Right at the start of the Trigger rebuild sanding back the nearside wing front and rear revealed the SE Command logo (now corrected SE District as per the info in the pic below) which I have as the title picture at the top of this blog. Since then I have had the word out that I need a quality pic of a whole one to get some vinyl ones made from. I could have traced and hand painted but that would have been a PITA for the vertical rear emblem.
Well it looks as if this may all becoming good!
Friend and neighbour while passing thro' the officers mess at Aldershot discovered the original artwork used as the basis of the SE logo! I now have a hi res pic ! But...the original artwork is far more detailed than the decals stuck on Trigger. Compare below.
As found under the paintwork....


Original artwork
More Wiki info..
22 September 2011
22 September 2011 - up and running
OK Mr Slow has put nowt up here for months due to work, fiddling with Trig's and the arrival of a baby girl so I have some excuses I s'pose?
Out of the 'butt list'....
1.Modify the exhaust to tame it down a tad? - I have bits but have't got to this yet
2.Fit an interior light - aaaah no.....not yet.
3.Change tx and main gbx oils - Done this !
4.Number plate bracket to be fabricated - and this!
5.Reduce the engine vibes at tickover. Engine and gbx rubbers? - cross this one off for now as I seem to be getting used to it?
A few new ones though....
6. One of the rear brake lights has an intermittant fault so a new Lucas 488 is on order
7. Smiths heater fan is rubbing inside the casing
8. Rear hub bolts worked loose the other day after a 20 mile fast run. Nipped up again but seem to be working loose?
9. Fit interior door handles
10. Fit battery isolator
On Sunday 11 September the local 'chapter' of the Series 2 club arranged a pub meet in Bratton near Westbury. A good turn out with around 10 S2's in all. Pub meal was followed by a ramble around the Imber perimeter road. (Thanks to Ian Cromwell on the S2 forum for the 'stolen' pics ;)


Out of the 'butt list'....
1.Modify the exhaust to tame it down a tad? - I have bits but have't got to this yet
2.Fit an interior light - aaaah no.....not yet.
5.Reduce the engine vibes at tickover. Engine and gbx rubbers? - cross this one off for now as I seem to be getting used to it?
A few new ones though....
6. One of the rear brake lights has an intermittant fault so a new Lucas 488 is on order
7. Smiths heater fan is rubbing inside the casing
8. Rear hub bolts worked loose the other day after a 20 mile fast run. Nipped up again but seem to be working loose?
9. Fit interior door handles
10. Fit battery isolator
On Sunday 11 September the local 'chapter' of the Series 2 club arranged a pub meet in Bratton near Westbury. A good turn out with around 10 S2's in all. Pub meal was followed by a ramble around the Imber perimeter road. (Thanks to Ian Cromwell on the S2 forum for the 'stolen' pics ;)
Trig's is at the far end of the line and the only 109 that turned up
The red flag was for the 'other side' of the road ;)
After our little unscheduled convoy I have decided I need to install the CB that has been sitting in the garage. Without it I cannot hear the bickering behind us!
The unsteady handling on the 7.50 Lassa 8 ply tyres will also hopefully be sorted over the next few days. I plan to get these removed and the 7.50 Bridgestone Wrangler radials that came with the 109 re-fitted to the LWB rims.
25 July 2011
23 July - Starter replaced and butt list nearly there
STARTER
The replacement 'Valeo' solenoid arrived from Craddocks (it was Britpart) and looked to be good quality. We will see.
So stuck this on the started assy and tried to refit to the flywheel casing after testing it on a battery (all good). Now taking it off took 20 minutes - tops. Getting it back in took over an hours and involved torrent of abuse and chopping off a few stud ends passing through the chassis so it would go back on. Ho hum?
Now installed and fired up on the button.
TOW BAR etc.
Completed the towbar electrics (no buzzer!) and fitted the 3 tonne ball and pin hitch that used to be on Cartman (S3).
The height of the ball needs to be checked against our ally log haul trailer. I don't really want to drop it further (currently 27") as that would require additional bracing to the chassis rails and make it a bit too 'plough like'. The Defender hitch is lower at 22" but could go up 2". I could block the hitch up on the trailer by 2-3" which would balance the difference out?
GEARBOX
Trigger has spent most of the past 3 years sitting on the drive doing nowt so at some point I had fitted the diffs/gearboxes etc. and filled them with oil but I thought I had better just re-check all of them just in case it has either leaked out over the past years...or anything else?
Transmission seemed a bit noisy under load anyway.
Front and rear diffs were fine. Main gearbox was fine. The transfer box was another issue and though full it was full of this! (Oh and why the hell does this site rotate all the pics to 4:3 format FFS?)

Looks very emulsified? S2 forum post ---> http://www.series2club.info/forum/index.php/topic,46350.msg412746.html
Dumped the contents and refilled with some EP90 and other manual gbx oil I had around and will take it around the block to give it a good flush through. I have ordered 4 litres of Castrol Syntrans (SMX-S) synthetic to put in there after and will leave enough to change the main gbx oil too.
Also noticed that when in 2nd gear and I lift off the power it occasionally jumps out of gear. Maybe the oil change will help but long term I have a spare S2 box to strip down and overhaul as a side project (if I have time?).
ELECTRICS
Reverse light stopped working just before the MOT (not a testable item). Found out it was due to a poor contact on the base of the bulb.
I had to use the horn at the weekend to warn a non-indicating lane changing van driver he was about to be rammed and realised it sounded like a strangled ferret. Took that one off (bike horn) and located the original LR horn in a box at the back of the garage. Nice and loud now!
INTERIOR
The issue of the seat belts being too short (for some) was fixed by rotating the seat belt locking arms the other way up and switching them from side to side. So no need to buy new ones (that saved £30!).
Door cards fitted to both doors which tidies up the interior and adds a bit more soundproofing.
Rear bed tie down points refitted.
BUTT LIST
Not many items from the original post MOT butt list still remain so time to update and start a new one?
All the above followed by another ramble out on the Plain running on 100% SVO


The replacement 'Valeo' solenoid arrived from Craddocks (it was Britpart) and looked to be good quality. We will see.
So stuck this on the started assy and tried to refit to the flywheel casing after testing it on a battery (all good). Now taking it off took 20 minutes - tops. Getting it back in took over an hours and involved torrent of abuse and chopping off a few stud ends passing through the chassis so it would go back on. Ho hum?
Now installed and fired up on the button.
TOW BAR etc.
Completed the towbar electrics (no buzzer!) and fitted the 3 tonne ball and pin hitch that used to be on Cartman (S3).
The height of the ball needs to be checked against our ally log haul trailer. I don't really want to drop it further (currently 27") as that would require additional bracing to the chassis rails and make it a bit too 'plough like'. The Defender hitch is lower at 22" but could go up 2". I could block the hitch up on the trailer by 2-3" which would balance the difference out?
GEARBOX
Trigger has spent most of the past 3 years sitting on the drive doing nowt so at some point I had fitted the diffs/gearboxes etc. and filled them with oil but I thought I had better just re-check all of them just in case it has either leaked out over the past years...or anything else?
Transmission seemed a bit noisy under load anyway.
Front and rear diffs were fine. Main gearbox was fine. The transfer box was another issue and though full it was full of this! (Oh and why the hell does this site rotate all the pics to 4:3 format FFS?)

Looks very emulsified? S2 forum post ---> http://www.series2club.info/forum/index.php/topic,46350.msg412746.html
Dumped the contents and refilled with some EP90 and other manual gbx oil I had around and will take it around the block to give it a good flush through. I have ordered 4 litres of Castrol Syntrans (SMX-S) synthetic to put in there after and will leave enough to change the main gbx oil too.
Also noticed that when in 2nd gear and I lift off the power it occasionally jumps out of gear. Maybe the oil change will help but long term I have a spare S2 box to strip down and overhaul as a side project (if I have time?).
ELECTRICS
Reverse light stopped working just before the MOT (not a testable item). Found out it was due to a poor contact on the base of the bulb.
I had to use the horn at the weekend to warn a non-indicating lane changing van driver he was about to be rammed and realised it sounded like a strangled ferret. Took that one off (bike horn) and located the original LR horn in a box at the back of the garage. Nice and loud now!
INTERIOR
The issue of the seat belts being too short (for some) was fixed by rotating the seat belt locking arms the other way up and switching them from side to side. So no need to buy new ones (that saved £30!).
Door cards fitted to both doors which tidies up the interior and adds a bit more soundproofing.
Rear bed tie down points refitted.
BUTT LIST
Not many items from the original post MOT butt list still remain so time to update and start a new one?
- Modify the exhaust to tame it down a tad?
- Fit an interior light
- Change tx and main gbx oils
- Number plate bracket to be fabricated
- Reduce the engine vibes at tickover. Engine and gbx rubbers?
All the above followed by another ramble out on the Plain running on 100% SVO


16 July 2011
15/16 July - Front brakes fixed plus a new problem
BRAKES
I noticed last week after the weekends shakedown that the brakes all would need to be adjusted again after bedding in. So tonite I jacked up the axles and gave them all a click on the snail cams.
Rears were fine (so they should be after all the time I devoted to them!) but one of the snail cams on the NS front would not tighten the shoe against the drum. Last time I adjusted this was about a year ago so off came the drum. It turned out one of the cam 'heads' had not been driven over the splines of the rear shaft which allowed it to turn. Result being no further pressure could be applied to the shoe without the assembly trying to undo itself.
The trick to getting these cam assy's to tighten up square is to hold the front screw with an 11mm spanner and only rotate from the rear (14mm). This way the rotating force of the front screw head does not cause the cam to drift out of line.
Fronts now adjusted up fine.
STARTER MOTOR
Last weekend Trig would occasionally refuse to start on the button, and the 'occassions' were getting more frequent by the end of play Sunday. I would hit the starter and there would be a click as the solenoid engaged and the sprag went forward but no rotation from the motor.
Voltage on the solenoid etc. were all good and when the starter contacts were shorted (along with the solenoid input for the sprag) the engine fired up straight away - so it must be the solenoid assy.
Pulled the starter (came out from under Trig without too many hassles) and checked it is the original fitment Valeo and not a cheap 'Britsmart' copy. So complete solenoid assemblies are available for about £30. So ordered one from Craddocks (RTC 4978).
For comparison for a complete starter motor assy a sh1tsmart is around £100, Valeo £160 and Bosch £200.


On splitting the business end of the starter I found the comm surface to be in very good condition, and the brushes seemed 'almost new'. So I just gave it a general clean-up and some dry PTFE lube on the sprag gears and shaft. Then a bit of ubiquitous BBQ paint to the end cap etc. ;)

If anyone needs to source new brushes then check these guys out. Very good prices for Paris-Rhome (Valeo) etc. ---> http://www.anglocarbon.com/acatalog/Paris_Rhone_Starter.html
INTERIOR DOOR HANDLES
In the last blog post I mentioned trying to locate some of the original Series LR interior door handles. These are now selling for around £30 a pair on 'the bay' which seems extortionate for something that not many years ago was treated as scrap.
Anyhoo a post on the Series 2 forum brought a reply of, 'Paddocks still have them in stock...for £6 each!'. So for info if anyone needs handles search for Land Rover part No. 306460.
Order now placed and lets see whether they actually appear?
UPDATE!! - Paddocks rang back today to say the handles will be with them Monday and they will be sent to Tuesday!
I noticed last week after the weekends shakedown that the brakes all would need to be adjusted again after bedding in. So tonite I jacked up the axles and gave them all a click on the snail cams.
Rears were fine (so they should be after all the time I devoted to them!) but one of the snail cams on the NS front would not tighten the shoe against the drum. Last time I adjusted this was about a year ago so off came the drum. It turned out one of the cam 'heads' had not been driven over the splines of the rear shaft which allowed it to turn. Result being no further pressure could be applied to the shoe without the assembly trying to undo itself.
The trick to getting these cam assy's to tighten up square is to hold the front screw with an 11mm spanner and only rotate from the rear (14mm). This way the rotating force of the front screw head does not cause the cam to drift out of line.
Fronts now adjusted up fine.
STARTER MOTOR
Last weekend Trig would occasionally refuse to start on the button, and the 'occassions' were getting more frequent by the end of play Sunday. I would hit the starter and there would be a click as the solenoid engaged and the sprag went forward but no rotation from the motor.
Voltage on the solenoid etc. were all good and when the starter contacts were shorted (along with the solenoid input for the sprag) the engine fired up straight away - so it must be the solenoid assy.
Pulled the starter (came out from under Trig without too many hassles) and checked it is the original fitment Valeo and not a cheap 'Britsmart' copy. So complete solenoid assemblies are available for about £30. So ordered one from Craddocks (RTC 4978).
For comparison for a complete starter motor assy a sh1tsmart is around £100, Valeo £160 and Bosch £200.

The offending article

On splitting the business end of the starter I found the comm surface to be in very good condition, and the brushes seemed 'almost new'. So I just gave it a general clean-up and some dry PTFE lube on the sprag gears and shaft. Then a bit of ubiquitous BBQ paint to the end cap etc. ;)

If anyone needs to source new brushes then check these guys out. Very good prices for Paris-Rhome (Valeo) etc. ---> http://www.anglocarbon.com/acatalog/Paris_Rhone_Starter.html
INTERIOR DOOR HANDLES
In the last blog post I mentioned trying to locate some of the original Series LR interior door handles. These are now selling for around £30 a pair on 'the bay' which seems extortionate for something that not many years ago was treated as scrap.
Anyhoo a post on the Series 2 forum brought a reply of, 'Paddocks still have them in stock...for £6 each!'. So for info if anyone needs handles search for Land Rover part No. 306460.
Order now placed and lets see whether they actually appear?
UPDATE!! - Paddocks rang back today to say the handles will be with them Monday and they will be sent to Tuesday!
10 July 2011
10th July - Start on the butt list....
Saturday was spent at the RNAS Yeovilton air day where the Vulcan XH558 actually flew!
I have not seen this in the air for at least 25 years and it was a moving experience to see that 'flying' delta wing bomber chugging across the sky with it's bomb bays open. Designed in 1946 and flying from the 1960's with a 'stealthy' radar silhouette 30-35 years before the B1? Pity this is the only one flying and it is now on borrowed time....again?
Now back to getting Trig's bits fixed.
STEERING
Looking under the front axle this morning I found that I had replaced the steering stop screws with new stainless ones (from Minivin) some 'years' back and there was a world of clearance between the inside of the tyre and the front leafs on either side. The 109 is always going to have a larger turning circle than a Mini but lets see how much we can improve it, eh?
The wheels have a better offset than they would have had originally as they are early 110/late 109 LWB rims so I have a good chance of improving things anyway?
Checking the steering stops I managed to get an addition 3/8" wound in from each screw and there is still approx. a 2" gap from the edge of the tyre to the leaf on either side. These changes have made a huge difference for the better.
BUMPER
Twizzle came up trumps yesterday while I was at Yeovilton and had dropped off a tidy galv Series bumper. It isn't military spec. but tidy ones of that type are as rare as teeth on chooks so this could be modded to take the S2 bumperettes with the addition of a few holes.
After several hours with the wire wheel, brick acid and a drill it all looked like this.

I now need to knock up a bracket to relocate the number plate to the bumper. Currently it restricts airflow to the oil cooler.
RUNNING ON SVO
Following my thoughts that it was fuel starvation (and having checked and rectified the kinked pipes to the fuel selector anyway) I took a further look at the fuel/SVO tank.
What I found was that the inline filter was OK but the pick-up pipe from the tank was still fitted with a fine mesh gauze over the tip. Not a conducive medium for cold veg oil to flow through? The dieso tank pick-up had had a damaged gauze anyway and I had already ripped that off so I swapped them around so the 'non-gauzed' pick-up was in the SVO.
Took the 109 for a run on veg and it seems (for now) that that has done the trick. So time will tell if this was the cause?
08 July 2011
8th July....and the result of the MOT test was.......
.
He PASSED !!!!!!!!!!!!!!!!!!!!!!!!!!!!!!!
Now I didn't expect that. I was expecting to be hauled up on something but only two advisories came up. A low headlight on one side (they tweaked it) and play in the steering. This I will need to look at first but I'm sure I adjusted as much as I dare when I rebuilt the box?
I did have a worry on the way to the MOT center when the heavens opened and I bunged on the wipers. After half a mile the nearside/passenger wiper decided to part company with the bulkhead drive shaft end and deposited itself, luckily, onto the bonnet. I pulled over and grabbed it but only refitted it when I dropped the 109 at the test center. At least it didn't pop off while they were testing?
Another 'surprise' was when the garage were doing the smoke/emissions test (apparently ALL diesels now have to pass this). Unfortunately the bottom rad hose blew off and deposited all the coolant onto their test bay! They immediately shut Trig down, refitted the hoseclamp that popped off and refilled with water. Nothing seems to be harmed and I needed to flush through and refill with coolant anyway.
All together I am quite chuffed and picking up a 12 month RFL for nowt is the icing on the cake?

So the rest of the afternoon was spent giving Trigger a shakedown. The result of which is a further short list that need to be tackled.
1. Check whether there is any adjustment left in the steering box - NOW DONE (8/7/11)
2.Fix the errant NS wiper - DONE (8/7/11)
3. Fit a small silencer to the exhaust. It is loud! - DONE
4.Lacking power on SVO. Fuel starvation? - DONE ....I hope.
5. Find some larger door mirrors. DONE (16/7/11)
6. Sort out the tow bar and wiring DONE 23/7/11
7. Seat belts are too short for anyone past my stature so I need to look at replacements.DONE 23/7/11
8.Steering stops make the 109 like a Thames barge to manoeuvre. - DONE (10/7/11)
9.Once all these are sorted out then look at the front bumper. - |DONE (10/7/11)
10. 'Calibrate' the speedo. 20% out at mo
Buzzing about today I did around 30 miles on 70% SVO. The tank was then topped up with another batch so now probably closer to 90% SVO. The offside tank is 100% dieso.
Ran without any issues until I topped up the SVO tank, went for a longer run then hit the throttle on the A303. I seem to be hitting a 'wall' when I drop the throttle. Feels like fuel starvation. As the SVO oil lines are heated by the FPHE I am thinking a fuel restriction somewhere on the SVO supply/return. Literally as soon as I select dieso the problem goes away and Trig will hit 65mph or so without any effort.
I first found that the supply pipes into the fuel supply selector valve were bent and restricting flow. I fixed that but it made no difference. Next item to check is the SVO tank in-line filter. It has been sitting there for about a year full of SVO so maybe that is blocked? If that isn't the cause then I may run a direct supply and return to/from the SVO tank to the engine lift pump. That will also cross off the manual fuel selectors as being the cause of the issue?
He PASSED !!!!!!!!!!!!!!!!!!!!!!!!!!!!!!!
Now I didn't expect that. I was expecting to be hauled up on something but only two advisories came up. A low headlight on one side (they tweaked it) and play in the steering. This I will need to look at first but I'm sure I adjusted as much as I dare when I rebuilt the box?
I did have a worry on the way to the MOT center when the heavens opened and I bunged on the wipers. After half a mile the nearside/passenger wiper decided to part company with the bulkhead drive shaft end and deposited itself, luckily, onto the bonnet. I pulled over and grabbed it but only refitted it when I dropped the 109 at the test center. At least it didn't pop off while they were testing?
Another 'surprise' was when the garage were doing the smoke/emissions test (apparently ALL diesels now have to pass this). Unfortunately the bottom rad hose blew off and deposited all the coolant onto their test bay! They immediately shut Trig down, refitted the hoseclamp that popped off and refilled with water. Nothing seems to be harmed and I needed to flush through and refill with coolant anyway.
All together I am quite chuffed and picking up a 12 month RFL for nowt is the icing on the cake?

So the rest of the afternoon was spent giving Trigger a shakedown. The result of which is a further short list that need to be tackled.
1.
2.
4.
8.
9.
10. 'Calibrate' the speedo. 20% out at mo
Buzzing about today I did around 30 miles on 70% SVO. The tank was then topped up with another batch so now probably closer to 90% SVO. The offside tank is 100% dieso.
Ran without any issues until I topped up the SVO tank, went for a longer run then hit the throttle on the A303. I seem to be hitting a 'wall' when I drop the throttle. Feels like fuel starvation. As the SVO oil lines are heated by the FPHE I am thinking a fuel restriction somewhere on the SVO supply/return. Literally as soon as I select dieso the problem goes away and Trig will hit 65mph or so without any effort.
I first found that the supply pipes into the fuel supply selector valve were bent and restricting flow. I fixed that but it made no difference. Next item to check is the SVO tank in-line filter. It has been sitting there for about a year full of SVO so maybe that is blocked? If that isn't the cause then I may run a direct supply and return to/from the SVO tank to the engine lift pump. That will also cross off the manual fuel selectors as being the cause of the issue?
07 July 2011
02 July 2011
1st July - Brakes fixed and suspension loaded
BRAKES
After having decided a few weeks ago that the rear brake snail cams were worn so far that they wouldn't allow the shoes to be adjusted up against the drums I then find that was not the reason for their lack of adjustment.
The new 'snails' had arrived and I proceeded to fit these and then found I had the same problem (though at least the new cams weren't worn smooth).
What I then realised was the rear brake shoes were slightly different so they must be trailing and leading types - though the green bible or Haynes or anywhere else said nothing about that. So I pinged an enquiry on the Series 2 forum and DavidTS pointed to part of Teri-Ann Wakemans informative site which says just that!
http://www.expeditionlandrover.info/landRoverFAQ/FAQ_rearbrakes.htm
So now the brakes are assembled as Teri suggests and they work fine. So all those with a 109 - take note!
Note the difference in the brake shoes in my pic below. The leading shoe is the top one.


SUSPENSION
There are alternative methods of loading the suspension before tightening the whole lot up but wrapping a chain around the chassis and compressing it seemed like a ripe way to damage the paintwork and galv so I thought of another method.
In the front seats I dropped in a two spare 750's plus around 80kg made up of bins full of water (about the weight of 2?). Then to the rear a further 500kg of water in dustbins and buckets. Should be enough meethinks?

Suspension then tightened up. So that's another two jobs crossed off.
A quick run out proves everything is working fine (though the base of the Larkspur antenna became unbonded on the way home).

Next task is to set the headlights angle and fit the bumper.....and book an MOT.
22 June 2011
18/19th June - Few MOT bits fixed
I came home for a 3 day weekend with a backlog of chores to do. Even then a few small jobs were struck off on Trig.
From the last post there were a few problems that need resolving for the MOT.....
BRAKES
The run out the other week showed that they work but I felt they should be a bit more solid in their action. So I already thought one of the lefthand rear shoes was not adjusting up correctly anyway and stripping them down showed why.....the snails cams were worn past the point they actually worked!
So a new set is on order and will be ready to fit when I get back from this job towards the end of June.
BUMPER
Rob has donated his old ex-mil bumper from his S3 but the overriders need to come off and are being a 'bit' stubborn. Front bolts had to be disked off but the 8 internal ones will need a different approach. They have been soaked in WD40 for several days and I have a couple of new 9/16 ring spanners on order. This is the only means (plus drop in a touch of extreme swearing) other than a good application of a gas torch, that will get them off.
Once off I will fit the bumper 'as is' for the MOT, then remove and arrange repair (bent at one end) plus sandblast and maybe re-galv along with the correct and original overriders.
DASH/INSTRUMENTS
Well I said that that side of it was complete but prowling 'The Bay' a few weeks ago I found a supplier (Green Oval Land Rovers) that manufacturers and sell a copy of the original painted and embossed brass labels to fit over the Lucas toggle switches. So I ordered a few including a 'heated front windscreen' one ;)
...and the priority 1 task was fitting the bridge plate. Tick that one off :)
I am now away again for a few weeks but on my return I will get the bumper on; the brakes fixed and the suspension set. Then I will go for a run and see how that goes. If it goes to plan then I will schedule the MOT!
From the last post there were a few problems that need resolving for the MOT.....
- INDICATORS - Problem now resolved by replacing the front Lucas 594 metal lamp housings.
- SPEEDO NOT WORKING - Fault found to be the flexi drive shaft end that engages with the speedo at the rear. The bush fitted over the shaft had moved preventing it from fully engaging with the drive gear in the head.
- BRAKES - see below
- SUSPENSION - still needs loading and torquing up.
BRAKES
The run out the other week showed that they work but I felt they should be a bit more solid in their action. So I already thought one of the lefthand rear shoes was not adjusting up correctly anyway and stripping them down showed why.....the snails cams were worn past the point they actually worked!
So a new set is on order and will be ready to fit when I get back from this job towards the end of June.
BUMPER
Rob has donated his old ex-mil bumper from his S3 but the overriders need to come off and are being a 'bit' stubborn. Front bolts had to be disked off but the 8 internal ones will need a different approach. They have been soaked in WD40 for several days and I have a couple of new 9/16 ring spanners on order. This is the only means (plus drop in a touch of extreme swearing) other than a good application of a gas torch, that will get them off.
Once off I will fit the bumper 'as is' for the MOT, then remove and arrange repair (bent at one end) plus sandblast and maybe re-galv along with the correct and original overriders.
DASH/INSTRUMENTS
Well I said that that side of it was complete but prowling 'The Bay' a few weeks ago I found a supplier (Green Oval Land Rovers) that manufacturers and sell a copy of the original painted and embossed brass labels to fit over the Lucas toggle switches. So I ordered a few including a 'heated front windscreen' one ;)
...and the priority 1 task was fitting the bridge plate. Tick that one off :)
I am now away again for a few weeks but on my return I will get the bumper on; the brakes fixed and the suspension set. Then I will go for a run and see how that goes. If it goes to plan then I will schedule the MOT!
10 June 2011
June/Week 22 - Loads done!
After the bank holiday Monday I managed to tag on a few more days vacation so a bit more Trigger stuff could be struck off.....so....
FUEL GAUGES
Now fixed!
The new voltage stabiliser fixed the zebedee like fuel gauge action :)
In the end I had to use the whole S3 dash instrument as the individual fuel gauge would not fit the S2 unit (different dims etc.).
The only issue I can see long term are the sender switches fitted to the military fuel selector selector/valve. These had to be stripped down a few months back because they had seized due to lack of use and corrosion. I now find that even though they had been lubed up and kept in storage, one had jammed. So this one was dismantled - again, more ACF50 injected down the shaft and it is now working. Time will tell how they fair but TBH a selector switch on the dash would be more reliable and cheaper to the tune of £50?
OTHER ELECTRICS
While I was fiddling with the fuel gauges and had the instrument panel open I thought I may as well do the final odds and sods to save me prying it open again for a while.
First the Smiths round heater fan was connected up with an in-line fuse through a switch under the dash fitted alongside the original fan speed rheostat. The old 'stat was FUBAR'd so this is an easy fix (heater is efficient at heating the interior of the 109 as a hot tadpole so full speed or nowt IMHO).
Heated drivers windscreen also wired in via a 15A in-line fuse. Dash switch enables that via a 30A relay when the ignition is on and I also rigged up a little reminder lamp on the dash.
Front indicators were playing up and I found two reasons for this.
A) The nearside indicator unit (Lucas 594?) no longer had a spring with any real spring'yness to push the bulb forward and make good electrical contact. The other indicator wasn't much better. So two new units ordered 'sans' internal corrosion and age. Two types of bulb housing were found at the front 488 and 594. The latter is the easiest to remove the bulb from and cheap at £7 each.
B) The original (or at least very old) mechanical flasher unit has very irregular timings. This would be an MOT fail. So I need to replace this, and so far a rummage though the bits box hasn't dug up another or even an electronic equivalent. I will keep searching.
So, for now, there aren't ,many electrickery bits to do...... ;)

THE FIRST RUN!
The farmer at the back of me let me take Trig for a couple of runs around the field to check brakes etc. and of course a few items showed up straight away.
SUSPENSION
Currently all the bolts/screw/nylocks etc. have still to be tightened up so the rear is a bit 'waggy' due to the height (combat chassis at max and new parrots). So the plan is to fill up the 109 with drums of water in the front (and back) to load up the suspension (around 500kg) and then tension the whole suspension set-up. Easy to unload when it is water....and I don't know enough fat people to fill the truck anyway.
INTERIOR
OK, now the plan was to keep the truck as original as I could (ignoring the tdi!) but with doors with no sound proofing would be a farce with a rattley diesel under the hood. So I also decided to order a set of door cards from Trakkers/Exmoor Trim. The matting inside the door would get beaten up otherwise (my excuse)?
All I need now are some interior door handles. Having a bit of trouble sourcing them at the moment seeing as I am out of the country most of the time, but......... Twizzle - if you are reading this do you have any at the back of your shack?
OTHER
Front bumper 'should' be with me in the next week if Rob gets his new shiney powder coated one on his 109........ ;)

New yellow bridge plate also on the dining room table for the front wing.
FUEL GAUGES
Now fixed!
The new voltage stabiliser fixed the zebedee like fuel gauge action :)
In the end I had to use the whole S3 dash instrument as the individual fuel gauge would not fit the S2 unit (different dims etc.).
The only issue I can see long term are the sender switches fitted to the military fuel selector selector/valve. These had to be stripped down a few months back because they had seized due to lack of use and corrosion. I now find that even though they had been lubed up and kept in storage, one had jammed. So this one was dismantled - again, more ACF50 injected down the shaft and it is now working. Time will tell how they fair but TBH a selector switch on the dash would be more reliable and cheaper to the tune of £50?
OTHER ELECTRICS
While I was fiddling with the fuel gauges and had the instrument panel open I thought I may as well do the final odds and sods to save me prying it open again for a while.
First the Smiths round heater fan was connected up with an in-line fuse through a switch under the dash fitted alongside the original fan speed rheostat. The old 'stat was FUBAR'd so this is an easy fix (heater is efficient at heating the interior of the 109 as a hot tadpole so full speed or nowt IMHO).
Heated drivers windscreen also wired in via a 15A in-line fuse. Dash switch enables that via a 30A relay when the ignition is on and I also rigged up a little reminder lamp on the dash.
Front indicators were playing up and I found two reasons for this.
A) The nearside indicator unit (Lucas 594?) no longer had a spring with any real spring'yness to push the bulb forward and make good electrical contact. The other indicator wasn't much better. So two new units ordered 'sans' internal corrosion and age. Two types of bulb housing were found at the front 488 and 594. The latter is the easiest to remove the bulb from and cheap at £7 each.
B) The original (or at least very old) mechanical flasher unit has very irregular timings. This would be an MOT fail. So I need to replace this, and so far a rummage though the bits box hasn't dug up another or even an electronic equivalent. I will keep searching.
So, for now, there aren't ,many electrickery bits to do...... ;)

THE FIRST RUN!
The farmer at the back of me let me take Trig for a couple of runs around the field to check brakes etc. and of course a few items showed up straight away.
- SPEEDO - does not work. I need to investigate why.
- BRAKES - they do work but the nearside rear needs a look, as it seems the manual adjusters on one shoe are not working.
- STEERING - I was expecting vague as you would expect from a Series steering box but this was worse. Then I realised I haven't set up the tracking! Checked the dims against the 'green bible' and found the trackrod was 10mm/0.5" too long. Adjusted it up and it was a lot better. I also need to check that all the TRE's are locked in position.
SUSPENSION
Currently all the bolts/screw/nylocks etc. have still to be tightened up so the rear is a bit 'waggy' due to the height (combat chassis at max and new parrots). So the plan is to fill up the 109 with drums of water in the front (and back) to load up the suspension (around 500kg) and then tension the whole suspension set-up. Easy to unload when it is water....and I don't know enough fat people to fill the truck anyway.
INTERIOR
OK, now the plan was to keep the truck as original as I could (ignoring the tdi!) but with doors with no sound proofing would be a farce with a rattley diesel under the hood. So I also decided to order a set of door cards from Trakkers/Exmoor Trim. The matting inside the door would get beaten up otherwise (my excuse)?
All I need now are some interior door handles. Having a bit of trouble sourcing them at the moment seeing as I am out of the country most of the time, but......... Twizzle - if you are reading this do you have any at the back of your shack?
OTHER
Front bumper 'should' be with me in the next week if Rob gets his new shiney powder coated one on his 109........ ;)
23 May 2011
21st May - Wipers move and fuel gauge twitches
Another bunch of bits completed over the weekend!
ELECTRIKERY
Relocated the washer bottle and 'leccy pump forward of their original position so they now clear the turbo hosing. Then the windscreen wiper was wired in with the bits of cable from Turkey. Power applied and they both work - wiper even parks!


......so now two of the dash panels could be bolted in place.
Checking out the circuit I found that the supply from the voltage regulator was the cause. It goes up and down like a proverbial whor**...... You know the saying ;) So this looks to be FUBARRED?
....so I have just ordered an electronic one incl. P&P for £9. ---> http://classicstabilizers.webs.com/information.htm
So now to either fit the fuel gauge segment into the S2/2A round instrument or I will need to refurb the S3 unit and fit that?
INTERIOR/EXTERIOR etc.
Fitted the new seat cushions with leather securing ties. Tidy!

On the subject of Containergard. After the bonnet was painted and fitted a few weeks back I then came home to find the bonnet well had filled with water - and the paint had discoloured - badly! What was in the water to cause it I do not know, but it has not happened anywhere else. The paint had been cured for at least a week before the rain settled.

ELECTRIKERY
Relocated the washer bottle and 'leccy pump forward of their original position so they now clear the turbo hosing. Then the windscreen wiper was wired in with the bits of cable from Turkey. Power applied and they both work - wiper even parks!


While I was doing coloured string I also fitted the 'white' reversing lamp (ex Triumph Dolomite I believe) above the rear number plate light and cabled this through (with an inline fuse). This also worked - first time too. Woooo hoooo!
Going back to my fuel gauge issue from a month or so back. I dug out a Series 3 type gauge and rigged that up. The fuel meter then went up but then dropped to zero - then went back up - then dropped again...
....so I have just ordered an electronic one incl. P&P for £9. ---> http://classicstabilizers.webs.com/information.htm
So now to either fit the fuel gauge segment into the S2/2A round instrument or I will need to refurb the S3 unit and fit that?
INTERIOR/EXTERIOR etc.
Fitted the new seat cushions with leather securing ties. Tidy!

Looking at the bonnet it sits higher on one side than the other. 1" to the wing surface on one side and 1/4" on the other. Checking obvious things like wing position etc. they all were fine. Rad panel is also square. For the life of me I cannot work out why unless, maybe, the bonnet is twisted?
I still need to finish the mudshields on both front wings. The new one has been trimmed to fit and has had a coat of etch primer then Containergard. But...I have run out of fasteners. I will the lack of screws this week then they will be secure.On the subject of Containergard. After the bonnet was painted and fitted a few weeks back I then came home to find the bonnet well had filled with water - and the paint had discoloured - badly! What was in the water to cause it I do not know, but it has not happened anywhere else. The paint had been cured for at least a week before the rain settled.

19 May 2011
1st May - wings now on!
Stuck here in Turkey on a contract for 3 weeks and between work-email-eat-bed I now find the time to do a brief post re. trigger ;)
Before I set out for this job I luckily had two 4 day weekends free (thank you Will & Kate for generating an extra holiday) so I did manage to get some work on the 109 underway. It took a while but the wings are both now on but the internal mud shields need fettling. The passenger side one was too rusty so a replacement is on order (which, no doubt, will need fettlin' too) and the drivers side mud shield needs modification to clear the 'new' vac assisted servo. These items will have to wait for a week or so.
Front SE Command decal cleaned up a bit and measured for later reference. This will get replaced front and rear. On the searches around the net the colour scheme of this does not match the 'Tiger' logo for SE command disbanded in '44.


When I left Trig he looked like this
NOTE - rubber door stops now fitted to the front wings!
The metal military indicator/side light bezels are now at home, painted and ready to fit and I have a bunch of sound proofing and cable for the interior of the cab and the wiper motor (all aquired from my current task in Turkey ;) ). So that will be the job for this weekend - when I get back to the UK - tomorrow.
http://cgi.ebay.co.uk/Land-Rover-Military-90-110-Series-Light-Retaining-Ring-/170637314250?_trksid=p4340.m506&_trkparms=algo%3DNGRI%26its%3DI%26itu%3DUA%26otn%3D8%26pmod%3D170624805510%26ps%3D63%26clkid%3D134508788440576121
Oh, and the front seats needed work (now in dustbin) so a complete new set are in the dining room (apparently - they get in the way of the JRT's sock-a-tug-athon). Blow the expense?
24 April 2011
24 April 2011 - Wiring almost complete/wings modded
WIRING
The Autosparks loom was (as expected) a PITA and the cable circuit provided did not match the purchased loom. So Rob and myself spent a day piecing together what we had and what was needed to make it work ;)
So to date.....
Dragged the wings out from under a pile of cobwebs and dust around the back of the house last weekend and started fettling the drivers side wing.
Due to the fittment of the brake servo the wing needed modifiying to accomodate the increased diameter. This was a one-shot deal and too much taken off would look daft. Unusually for me I did do the job slowly and it doesn't look too bad IMHO.


The Autosparks loom was (as expected) a PITA and the cable circuit provided did not match the purchased loom. So Rob and myself spent a day piecing together what we had and what was needed to make it work ;)
So to date.....
- Lights all work now. Initially the original rear lamps worked intermittantly and the fault was narrowed down to poor bullet connections. These were stripped and soldered on. No further problems.
- Engine starts and runs on the start button
- Battery charging (though charge warning stays on at tick-over?)
- Temperature gauge works fine
- Wiper motor - S3 two position switches are now NLA new so for now I will stay with the single position wiper switch with no self park. Just need to run a cable across the dash.
- Screen washer - cleaned up as part of the wing overhaul needs a cable running to it.
- Reverse light - switch cable there I just need to dig out a suitable 'period' light assy for the task. Low priority.
- Heated screen relays/wiring. Low priority.
- Fuel gauge doesn't read correctly so I need to check whether some of my 'spare' fuel level gauges will work with the modern float assy's.

During the sanding down a further military insignia was found under the paintwork. This matches one found under the South Eastern Command 'Tiger' insignia on the LH wing. - TRG CENTRE -. No idea what 'training centre' this relates to yet.

Bonnet needed a good going over and all the parts were treated to some Dinitrol underbody wax once all the necessary repairs had been completed.

Bonnet now back on and RH wing ready to fit. Note that I am not trying to make this S2 concours by any stretch of the imagination. Tidy it up/fix where necessary/make it usuable for 20 more years. The Containergard paint is high build and leaves a 'rough' finish when compared to normal enamel etc. At the end of the day this was a military vehicle and with this paint finish it will be hard wearing and easy to touch up.

Next task is to finish the LH wing and get the whole lot assembled. The bulkhead to wing J-nuts are on their way so maybe next weekend it will go back to looking like a whole 109 after 2 years in pieces?
Also need to find a part No./source for the military metal indicator/sidelights. Two are completely rusted through, though the rubber fittings are fine.
On the each wing there is a purpose made hole through the steel reinforced frame. Looks to be from manufacture and the suggestion I have received is this would take a rubber bump stop for the door to buffer against? The PO had fitted indicators in there.

Chased this up on HMVF and the result was this ---> http://hmvf.co.uk/forumvb/showthread.php?24046-Land-Rover-Series-2-wing-mounted-door-stop
20 February 2011
20th Feb - Wiper now works!
WIPERS
The 109 would have originally been fitted with two single wipers mounted through the windscreen. The holes are still there for them but a PO fitted a similar vintage DR3A single wiper motor. This did not seem to be working too well and after a strip-down decided not to work at all now.
So I had a later dual speed S2A/3 type (Lucas 14 Watt dual speed) aquired from some LR jumble or other so this was stripped down and overhauled. This one works 100% including the self park! So this has been fitted in the dash and now I just need to get or make a mounting bracket to suit.
For info the wiring details for the Lucas 14w are detailed below ;)
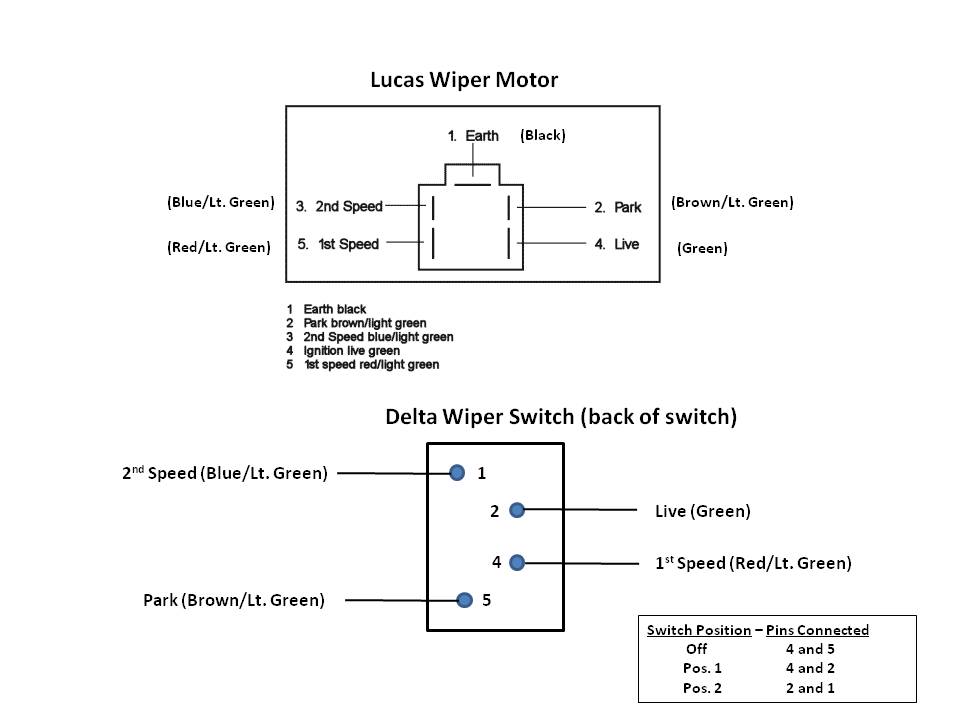
Note - Aquired from a post by 'Peterux' on the madaboutkitcars forum http://www.madabout-kitcars.com/forum/showthread.php?p=14250
The dash controls are only set up for single speed to I will live with that for now but I will need to fit a relay to enable the self park to work.
WIRING
Well I have actually started. I wasn't looking forward to it but I have made a start and the main chassis loom has been pulled through now - I also included a couple of spares (one for the reverse light) and a draw wire unless I ever need to pull in even more at a later date.
The cables have been routed into each rear tub box ready for termination and the tow socket cabling has also been fed to the right hand box.
Just need to get those ends terminated and I can start looking at the business end of the 109.
The 109 would have originally been fitted with two single wipers mounted through the windscreen. The holes are still there for them but a PO fitted a similar vintage DR3A single wiper motor. This did not seem to be working too well and after a strip-down decided not to work at all now.
So I had a later dual speed S2A/3 type (Lucas 14 Watt dual speed) aquired from some LR jumble or other so this was stripped down and overhauled. This one works 100% including the self park! So this has been fitted in the dash and now I just need to get or make a mounting bracket to suit.
For info the wiring details for the Lucas 14w are detailed below ;)
Note - Aquired from a post by 'Peterux' on the madaboutkitcars forum http://www.madabout-kitcars.com/forum/showthread.php?p=14250
The dash controls are only set up for single speed to I will live with that for now but I will need to fit a relay to enable the self park to work.
WIRING
Well I have actually started. I wasn't looking forward to it but I have made a start and the main chassis loom has been pulled through now - I also included a couple of spares (one for the reverse light) and a draw wire unless I ever need to pull in even more at a later date.
The cables have been routed into each rear tub box ready for termination and the tow socket cabling has also been fed to the right hand box.
Just need to get those ends terminated and I can start looking at the business end of the 109.
14 February 2011
Feb 2011 - After weeks of no blog access I can get back in!
Google is a PITA - fact! I haven't been able to get access to update the blog for weeks due to some 'dashboard' problem but today I have managed to get back in. Huzzaaah!
Actually managed to get a few jobs ticked off over the past few weeks despite the freeze.
BRAKES
Front brakes checked over and adjusted with the old drums fitted (at least these are closer to round).
AIR FILTER
Originally the plan was to use the Disco filter and locate this vertically on the chassis mounted battery tray using the oil bath filter holder. This would then have been connected using two Series diesel hoses back to the turbo intake - but I ditched this idea.
To make things simple, and save space I spoke with a local performance air filter supplier and looked through their stock to find something suitable and went with a cone filter with a 60mm inlet. Connected this via a new Series diesel intake hose and for now it will sit over the inlet manifold. Once the wing goes on I will tuck it there. Saves loads of space and it is re-oilable (I have the correct oil etc. to hand anyway for the bike etc.).
INSURANCE
All this time Trigger has sat on the drive uninsured and I thought it was about time to get that addressed.
Rang around a few selected places and settled with Adrian Flux. £120 fully comp modified with the tdi and heated screen etc. plus legal and an agreed value of £6k! To get the agreed value I had to submit a bunch of photos inside and out, but the wings were not fitted. Thought this would be a problem but after a weeks delay they came back with a yes to the proposed value.

WIPERS
While prep'ing to get the wiring loom in (I have now laid it out and worked out WTF all the wires are - and it isn't correct to spec!) I though I may as well strip and check the wiper motor out.
The wiper is an early single speed Lucas wiper DR3A and the connections were not listed in the green bible or anywhere else I could find. So I found some knowledgable persons on the Series 2 forum ;)
1- Switch 0 Volt/earth supply
2 - Permanent +12vdc
E - Perm 0 Volt.
So now I know.
Stripped the unit down and it seemed in good con (commutator @ 1 Ohm) but then I managed to lose the small spring and insulators fitted between the comm brush arms (pinged somewhere across the garage).
Dipped the stator in laquer as the old coating over the coils was peeling and air dried next to log burner for a few days. Stator res 8 Ohm.
So the next plan is to get the wiper motor temporarily assembled with a cable tie across the comm arms to check it still works OK. If so then I will order the new arm assembly (Yep. Still ava.).
Subscribe to:
Posts (Atom)